1. To edit, compile, and run a C# program using Visual Studio 2005, follow these steps.
Create a new, empty C# project by selecting File
New Project. Next, select Visual C#, and then Console Application, as shown here:
Then, change the name to Project1 and press OK.
Note: The precise screens that you see may vary based on which version of Visual Studio 2005 you have installed and your specific configuration.
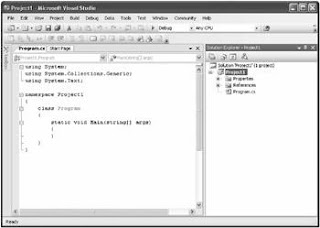
2. Once the project is created, the Visual Studio IDE will look like this:
3. Notice that a new window called Program.cs was created. This contains an empty template for a C# console program. This file is created automatically by Visual Studio 2005 and contains the skeleton to a C# program. However, this skeleton is more complicated than it needs to be for our purposes, so delete all of the lines in this window. After doing so, the Program.cs window will be blank, and look like this:
4. Next, enter the example program into the Program.cs window, and then save the file using the name Example.cs. (Remember, you can download the programs in this book from www.osborne.com.) When done, your screen will look like this:
5. Compile the program by selecting Build Solution from the Build menu.
6. Run the program by selecting Start Without Debugging from the Debug menu. When you run the program, you will see the window shown here.
As the preceding instructions show, compiling short sample programs using the IDE involves more steps than it does when using the csc command-line compiler. Therefore, for the programs shown in the first part of this book, using the command-line compiler is the recommended approach.
Subscribe to:
Post Comments (Atom)
Archives
-
▼
2008
(167)
-
▼
August
(36)
- Delay Sign an Assembly in C#
- Verify That a Strong-Named Assembly Has Not Been M...
- Give an Assembly a Strong Name in C#
- Create and Manage Strong-Named Key Pairs in C#
- Access a Program Element That Has the Same Name as...
- Selectively Include Code at Build Time in C#
- Access Command-Line Arguments in C#
- Create and Use a Code Library in C#
- Create and Use a Code Module in C#
- Short-Circuit Logical Operators in C#
- Relational and Logical Operators in C#
- Arithmetic Operators in C#
- Type Conversion of Expressions in C#
- C# Type Conversion and Casting
- The Scope and Lifetime of Variables in C sharp
- A Closer Look at Variables in C#
- C# Literals
- C# Some Output Options
- C# The bool Type
- C# Characters
- C# The Decimal Type
- C# Floating-Point Types
- C# Integers
- C# Value Types
- The C# Class Library
- C# Identifiers
- The C# Keywords
- Semicolons, Positioning, and Indentation in C#
- Handling Syntax Errors in C#
- Using the Visual Studio IDE
- Using csc.exe, the C# Command-Line Compiler
- A First Simple Program
- Inheritance
- Polymorphism
- Encapsulation
- C# Object-Oriented Programming
-
▼
August
(36)


No comments:
Post a Comment